Have you ever try to do a rubik ? At first glance, you might think that it is quite easy, just a few axis lock to each row and column will do the trick. However, is not so simple, with every rotation of the rubik, the relationship of the cubes is changing (27 cubes in total), there's no way you can lock them to a fix axis.
In this mail, i will only focus on the movement of the rubik, not how to build the rubik from zero up, perhaps next time.
 First, we will use 'Import' to load a 'Box' 3D model. If you don't know where's your 3D model is, normally it's in your '/usr/discreet/smoke_2008/models' folder. Set it to view '3D studio', then you will see the 'Box' model.
 After loading the 'Box' into screen, remember to turn on the 'Shading' and 'Z-buff' on your DVE setup. The first thing we need to do with this 'Box' is to move it to the center of screen, and to move it's 'center point' to the center of screen, not just x & y, but also in z. This will enable us to rotate the rubik verticle and horizontal easily later without worry of the 'center point' of the rotation.
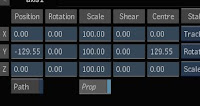
 The numbers i use here is, positionY -129.55, and centreY 129.55, and size it down to 50%.
 Make 8 more copies of the cube, then arrange the 8 copies around the 1st cube we build just now, like below.
 Make 8 more copies of the cube, then arrange the 8 copies around the 1st cube we build just now, like below.
 This is our center row, you can temporary attach an axis to the 9 cubes, then use copy branch to make 2 more copies.
 Then throw away the temporary axis. You should have 27 cubes now.
 Leave the 1st 9 cubes (the center row), Z move the 2nd 9 cubes to form the front row, and the 3rd 9 cubes to form the back row. To see the 3D effect, just move and rotate the camera a bit. You can name your axis properly something like "center top left","top row left".., but that wouldn't help much because thier relation and position will change with every rotation.
 Now, say i want to rotate the 1st row, i need to find the 9 cubes that involve, and add a axis above it.
 After found the 9 cubes, use duplicate (Green line) to link the axis together, and rotate it.
 To make a 2nd rotation, just find the new 9 cubes that's involve, and add a new axis above it just like what we did before. For every rotation, you will need to find the 9 cubes and add a new axis above it. To easy locate the 9 cube, i will start with hiden all cubes, then turn them on one by one, if that's the cube i want, i add a new axis above it.
This is how my nodes look like after 4 rotation. One rotation, One axis ! And each rotation, will form a new storey. The lower axis is the old rotation, the highest axis is the latest rotation.

 To animate the cube start form messing up, then turn into a perferct one, just start from the highers axis first, turn the rotation to zero, then go to the next level, and turn it to zero level by level.
 That's it, you can start mess up your rubik now, knowing that you can always fix it back to normal.

 To animate the cube start form messing up, then turn into a perferct one, just start from the highers axis first, turn the rotation to zero, then go to the next level, and turn it to zero level by level.
You can add a axis to control the movement of the whole rubik, just connect it to the highest axis of each column (27 columns in total).
 That's it, you can start mess up your rubik now, knowing that you can always fix it back to normal.
No comments:
Post a Comment