Tuesday, April 21, 2009

Character Animation

Autodesk Smoke Tips & Tricks - Character Animation

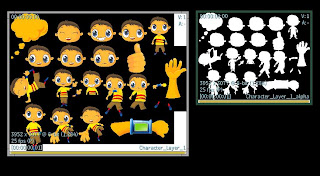
Here's one of targa file given by our animator 'Wah Chai'. The cartoon character was split out into many pieces, different faces expression, gestures and so on.For simple illustration, i would use the head as example. First, i loaded 3 different heads, and put them into same position. Then add a axisC for controlling the character.
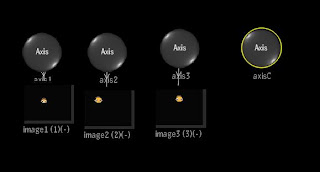
At image1 transparency, put in expression :
if(axisC.position.x==0,0,100)
At image2 transparency, put in expression :
if(axisC.position.x==1,0,100)
At image3 transparency, put in expression :
if(axisC.position.x==2,0,100)
At axisC, set animation to Constant.
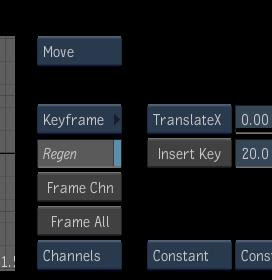
Now you can use your axisC 's positionX to control which head you want at anytime.
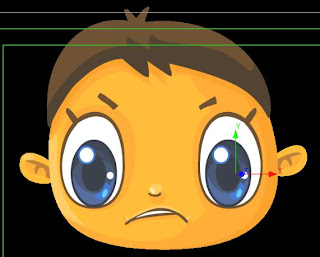
Provided that if your face is breaking into many small pieces, like nose, eyes, eye brown, mouth, then you can use axisC other parameters like positionY, Z, size X, Y, Z and so on to control each element of the face.
Say if you only got 1 frame of eye, you still can animate it by loading the image several times and twist each differently (size, postion, rotate....), then use the axisC to control it. For hand, you can load the same image few times, then each move forward slightly, between the movement, you can change to other gesture, and then control it with axisC.
Of course, this technique is suitable for cell animation only, if you want to animate the character all by yourself with axis movement, then it's a different story.

Wednesday, April 1, 2009

Simple Keystroke

Autodesk Smoke Tips & Tricks - Simple Keystroke

Very busy recently, no time to update the blog, here's a very simple keystroke some might not know of :

1. When you hit 'J' (Replace), the clip in desk will stretch to fit the clip lenght in recorder. But if you hit CTRL-J instead, the clip will just replace the clip without stretch. I used this very often to just change a shot between desk and recorder.

2. When i got a long duration clip, and i want to preview it, i could use the pen scroll through the clip. I could also use the stupid 'V' and 'up or down arrow' key to speed up the scroll speed. Another way i used quite often is, just press '5' numeric key then press and hold the 'left or right arrow' key, this will step through the clip every 5 frame, and you can change it very fast by just press another numeric number then press hold the 'left or right arrow' key again.

3. Another key stroke i used often is, if you smoke halt and not respon to any key press or pen move, then use ALT + TAB to call the smoke shell to front, then press CTRL + C to close the smoke.

Monday, February 16, 2009

Trail

Autodesk Smoke Tips & Tricks - Trail

Today i will use the 'SelectionOrder' expression to do this trail effect. Of course, you can do the similar effect with motion blur control or average effect, but sometimes i find the motion blur is a bit cumbersome, and the average effect is not in compositing itself.
Step 1 : Here i make an axis1 connect to a title image, and add a axisC to act as controller.
Step 2 : Do you animation to fly the image title around in axis1.
Step 3 : Duplicate the axis1 branch several times. Here i duplicate it 10 times.
Step 4 : In animation menu, select axis2, then in schematic, hold the 'control key', draw a box form left to right, start from axis2 to axis11 to select them.
Step 5 : in animation manual enter expression :
eval(axis1,frame-(SelectionOrder*axisC.position.x))
Step 6 : In axisC, set the postionX to 2, then run the animation. Change the positionX to other value to see what will happen.
Step 7 : Now i will going to set the trail fade effect. Select image2 (which join to axis2), and in the transparency enter expression :
image_L1.transparency-(axisC.position.y*2)
Select image3 and enter expression : image_L1.transparency-(axisC.position.y*3)
and do the same for the remains axis.
(Note: because my image is named image_L1, so in my expression, it is image_L1. If you image name is image1, then just use image1.transparency instead)Step 8 : Set axisC positionY to -14, and run the animation to see the fade effect. Try different fade value (positionY).Now, you can change the animation anytime by changing axis1, and you can also animate the trail amount and fade in animation.

Wednesday, January 7, 2009

Size & positionZ

Autodesk Tips & Tricks - Size & positionZ


First, i must thanks Tim Farrell for giving me this genius expression formula in autodesk smoke forum.

What i like to do here is, from the normal camera view, the picture looks nothing special.

However, once you rotate the picture or camera, it would reveal that the picture is actually formed by brunch of pictures with different z-depth.

Here, for simple illustrate, i take the same media and enter it few times, and crop each differently. For better effect, you can use gmask to mask out portion of the object out each.
In axis1 scaling, enter expression :

100*(axis1.position.z/(288/tan(radians(-0.5*camera.fov))))+100


In axis2 scaling, enter expression :
100*(axis2.position.z/(288/tan(radians(-0.5*camera.fov))))+100


and so on for other axis, just change the axis name accordingly. Mine is PAL pixel, for NTSC pixel, change 288 to 243 instead.


Then, just move each clip's positionZ close or further away, the scaling will take care of itself.

GPS - Global Position System

Autodesk Smoke Tips & Tricks - GPS

I'm back !! See, i told you "i'll be back!!" even though i forgot to wear my sun glasses. This technique is simple yet very powerful, it will detect the positionXY of an object. It's a bit advance than the GPS because mine also detect rotation.
Refer to the diagram below, the leftmost node is "A" still image attach to axis1. Text1 and Text2 node are label text "Position X" and "Rotation Z". You can add Text3 "Position Y" yourself here.Ready a 10 frames clip (from 0 to 9), enter as media 6 times. The 1st 3 is for position, last 3 is for rotation. Add 3 more if you have positionY.
For the 1st left number clip (the 10 frames) , in media slip & matte slip, enter expression :
((floor(abs(axis1.position.x/100))%10)+1)- frame

For the 2nd left number clip, enter expression :
((floor(abs(axis1.position.x/10))%10)+1)- frame

And for 3rd, enter expression :
((floor(abs(axis1.position.x/1))%10)+1)- frame

Now for the next 3 number clips.

For the 4th left number clip, enter expression :
((floor(abs(axis1.rotation.z/100))%10)+1)- frame

For the 5th number clip, enter expression :

((floor(abs(axis1.rotation.z/10))%10)+1)- frame

And for 6th, enter expression :
((floor(abs(axis1.rotation.z/1))%10)+1)- frame
Now, move and rotate your axis1 A image. The GPS will start to work.

For the negative and positive sign, you can add a 2 frames clip (+ and -), then in the media slip add expression :

frametoslip(if(axis1.position.x>=0, 1, 2))

As i mentioned earlier, this is very powerful technique, it can detect any parameter for an object (position, rotation, scaling, transparency, rgb color, crop .....). Plus, you can use it as number counter as well, just throw the A image away and use the axis positionX to control the counter.