Thursday, October 30, 2008

Music Beat Bar

Autodesk Smoke Tips & Tricks - Music Beat Bar

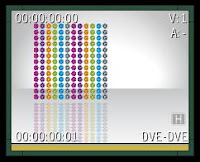
Here, i got 12 bars that needed to animate according to the music.Add Video
First, i loaded it 12 times, and cropped each one up.
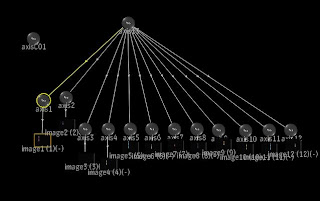
I hated to go around and searching for each media's crop to animate it. So, i created a new axis, and name it axisC01. I would used this axisC01 to control all medias' crop.
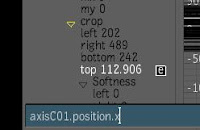
Media1 (1st left bar) crop top, enter expression : axisC01.position.x
Media2 (2nd left bar) crop top, enter expression : axisC01.position.y
Media3 crop top, enter expression : axisC01.position.z
Media4 crop top, enter expression : axisC01.rotation.x
Media5 crop top, enter expression : axisC01.rotation.y
....follow the above pattern until media12,
Media12 crop top, enter expression : axisC01.shearing.z
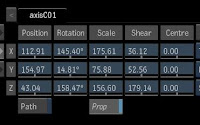
Then, i could use just axisC01 to control all my medias' crop. This was much easier to animate than taking the trouble to locate each media's crop.
I manually animated first bar's crop according to the music using axisC01 positionX.
I could do the same with other bar if i wanted to, just copy the animation value from positionX, then add a bit variation to each bar. But, i'm a lazy guy, so i let the expression do it.
In axisC01.position.y enter expression :
position.x + (noise(frame+1)*50)
In axisC01.position.z enter expression :
position.x + (noise(frame+2)*110)
In axisC01.rotation.x enter expression :
position.x + (noise(frame+3)*150)
....followed the same pattern until axisC01.shearing.z,
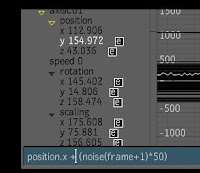
This way, each bar would have a bit of variation and random movement, but overall still followed the main bar's pattern. And if the music track change, i just need to animate back the 1st bar only.

Friday, October 24, 2008

Frame Counter

Autodesk Smoke Tips & Tricks : Frame Counter

Ready a clip, a 10 frame clips with 0 to 9 at the center of screen. Repeat the clip (Video - Repeat - Clip ) few times so it loop. Load it as media 4 times. Arange them side by side.

(Nota that media1 is 1st number, media2 is the 10th number, media3 is 100th number)

In media1, slip & matte slip enter expression :

frametoslip(floor((frame-1)/1))+1

In media2, slip & matte slip enter expression :

frametoslip(floor((frame-1)/10))+1

In media3, slip & matte slip enter expression :

frametoslip(floor((frame-1)/100))+1

Now, play the clip, the frame counter will count every frame. The reason the frame counter is one frame delay compare to the timebar because we start count from 000.

Wait a minute, what if you want to start the counter with 200 instead.


In media3, enter expression :

frametoslip(floor((frame+199)/100))+1

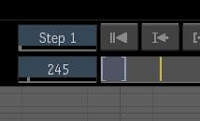
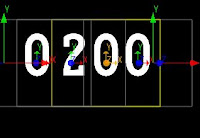
So, if you want 230, then in media2, expreesion :

frametoslip(floor((frame+29)/10))+1

Get the idea ? And don't forget to add some motion blur (see the previous tips random counter) .

There's even a more powerful frame counter technique, but no now, next time.

Thursday, October 23, 2008

Random Counter

Autodesk Smoke Tips & Tricks - Random Counter

Ready a clip, a 10 frame clips with 0 to 9 at the center of screen.
Load it as media 4 times. Arange them side by side.
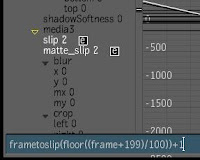
In the media slip and matte slip of each media, enter expression :
frametoslip(truerand(1,10))
Play it, you will see the random numbers.Now, we add motion blur to it.
in media1 blur Y enter expression : media.media1.slip *10
in media2 blur Y enter expression : media.media2.slip *10
in media3 blur Y enter expression : media.media3.slip *10
in media4 blur Y enter expression : media.media4.slip *10
The final result,

Tuesday, October 21, 2008

Expression Random Noise Every N Frame

Autodesk Smoke Tips & Tricks - Expression Random Noise Every N Frame

ref to tip Noise Every N Frame, the expression for generate random noise every N frame is :

noise(floor(frame/5))* 100

replace the '5' with whatever amount (frame) you want the noise to stay the same. '5' here mean generate a random value every 5 frame.

replace the 100, the bigger the number, the bigger the noise.

Monday, October 20, 2008

Define Your Own Media Expressions

Autodesk Tips & Tricks - Define Your Own Media Expression


open the userfun.expression file (user/discreet/{product_home}/expressions/userfun.expressions), or(user/discreet/project/{username}/expressions/userfun.expressions), add in this line:

# media strobe

strobee($strobeee) : frametoslip(frame-ceil(frame%$strobeee));

# media repeat frame

repeatt($repeattt) : frametoslip(floor(frame/$repeattt))+1;

# end of media strobe & repeat frame

Next time, when you want to do strobe in media, say strobe 5 frames just enter expression in the media slip & media matte:

strobee(5)

If you want to do repeat, say repeat every frame 3 times, enter expression in media slip and matte slip :

repeatt(3)

Tuesday, October 14, 2008

Animation Random Noise

Autodesk Smoke Tips & Tricks - Animation Random Noise
What i like to do here is, to have the character shaking randomly, then gradually come to stop.

As normal, i will create an axisC to control my random.

In axis1.position.x enter : noise(frame)*axisC.position.x
In axis1.position.y enter : noise(frame+1)*axisC.position.x
Now, you can use axisC positionX to control the horizontal shaking strength, and positionY to control the verticle shaking strength. To make the shaking gradually come to stop, just animate the positionX and Y from a big number then to zero over a period of time.

Tight Frame Shadow

Autodesk Smoke Tips & Tricks - Tight Frame Shadow

Say, you receive a graphic logo in Jpeg, the logo is filling out the whole frame, it's very tigth to the edge of the frame.

When you add a soft shadow, the shadow will be cropped out at the edge of the frame.
To solve the problem, just add a front source/matte source, then size it down inside the front/matte source.
Now, there's no more edge problem.

Bad Quality CCTV Look

Autodesk Smoke Tips & Tricks - Bad Quality CCTV Look

Here's my original pictures,
Give it a Front Source,
Inside the front source, shrink it down, here i size it down to 10%. The smaller you shrink, the worse the quality.
Then, in axis1, size it up to 1000%. The formula to size it up to the original size is :
100 * (100/N), where N is size down value of the front source.

You can put this in your axis1.scaling expression : 100 * (100/axis2.scaling)

Now, it become really bad cctv quality
May be, add a 2 frame strobe to the media slip: frametoslip(frame-ceil(frame%2)) , and some color spread out effect.

Friday, October 10, 2008

FX Filter (Part II)

Autodesk Smoke Tips & Tricks - FX Filter (Part II)

Refer to FX Filter (Part I), if you haven't read the 1st part.
Meet our superstar once more, here's the pictures before any magic numbers is applied.
Try put this number in,

This mean, take the current hot seat pixel, and subtract it from the above pixel value. Say current pixel value is R100,G100,B100, the above pixel value is R40,G40,B40, the result will be RGB60.
Here it become 'find edge' filter, wonder why ?
The reason behind this is, let take a look at the superstar's t-shirt, the whole area of the t-shirt is similar almost the same color (RGB), so when you subtract something similar say Orange R105, G065 - Orange R100, G060, will equal to R005, G005, it will be almost black. And, same with the whole face area, it will be almost black. When it comes to the high color contrast area (RGB) like the edge of T-shirt, The edge between two complete different object, the RGB value will be a huge different, so the result will be some big numbers, and you will see the outline. That's the concept of find edge or outline.
Of course, you can subtract from other surrounding pixel too, not necessary just the above pixel. And you can subtract a bit from left, right, top, bottom as well.
Understand the concept, you can create your own find edge or outline filter.


FX Filter Part III coming soon..

Media Repeat Frame Expression

Autodesk Smoke Tips & Tricks - Media Repeat Frame Expression

This is almost same with the previous tip Media Strobe Expression, but this time we will do repeat every frame in the clip N times. Is like you use 'Video' - 'Repeat' - 'Frames in Clip' , but we will do it in DVE with expression. Say, here i got 2 animation clips. The animation characters move every frame, however, here i want it to move only every 3 frames. The expression is: frametoslip(floor(frame/N))+1, just replace the N to whatever value you like it to repeat, put this expression into the media slip & matte slip.

To repeat every frame in the clip 3 times, expression is:
frametoslip(floor(frame/3))+1.
This will give result : frame 1,1,1,2,2,2,3,3,3,4,4,4....

Here i want to keep my option flexible, or maybe i want to change the repeat frame amount during animation. So, i made a new axis and name it axisC.

In media1 'Slip' & 'Matte Slip' put this expression:

frametoslip(floor(frame/axisC.position.x))+1

In media2 'Slip' & 'Matte Slip' put this expression:

frametoslip(floor(frame/axisC.position.y))+1

Now i can use the axisC positionX to control the repeat amount for media1, and axisC positionY to control media2 repeat amount. I can animate it if i want to. Try change the interperlation (linear, hermite, constant, natural) and see the different when you animate the freeze amount.

Tuesday, October 7, 2008

Paintbox Roll - Autodesk Smoke Tips & Tricks

Autodesk Smoke Tips & Tricks - Paintbox Roll

Here i got a still pictures, i want to move the compass to the right, but then there will be blank black at the left because the picture is not big enough.

I can go into the paintbox, use the RollX, to move the picture a bit to the right.
You will see that the joining edge of the picture is not good.
Use your paint tools like clone, paint, copy to touch up the edge.
After touching up the edge, you can freely move your picture left and right without the edge joining problem. You can do the same with RollY so that you can freely move the picture vertically without edge problem. Now, you can use the picture in DVE and move it vertically or holizontally freely.

You can also use this picture as texture fill with repeat mode to do a fast multiple pictures.

Monday, October 6, 2008

Media Strobe Expression

Autodesk Smoke Tips & Tricks - Media Strobe Expression

Here i got 2 medias, i want to do the strobe effect inside the DVE.
The strobe expression is :
frametoslip(frame-ceil(frame%N))
Just put the above expression in your media's 'Slip' and 'Matte Slip' value, and replace the 'N' in the expression to whatever value you want the strobe to be.

Say '5' will give the result : frame 1,1,1,1,1,5,5,5,5,5,10,10,10,10,10,.....

But here, i not really sure what's the exact strobe i want, i want to keep my option flexible and maybe animate the strobe along the way.
First, i created a new axis, i rename it axisC.
Then in the media 'slip' and 'matte slip' for media1, i enter expression :
frametoslip(frame-ceil(frame%axisC.position.x))

In the media 'slip' and 'matte slip' for media2, i enter expression :
frametoslip(frame-ceil(frame%axisC.position.y))

Now in axisC, you can use the PositionX parameter to control media1's strobe value, and PositionY to control media2's strobe value. You can try different value right at the schematic without need to go changing the expression. And you can animate the strobe value. If you do animate it, remember to try a different curve (hermite, linear, constant) to see a different result.